
Quick overview:
Imagine you switch on your computer and see the message "Disk unknown, not initialized". What would you do? This is particularly worrying if you have important data stored on the hard disk in question at the time of the incident. The hard disk is an important element of the computer as it stores the data. If the hard disk is not working properly, this can lead to data loss. To initialize the hard drive, you must first delete all data on the hard drive. This can either be done manually by deleting all files or by formatting the hard disk. Formatting means that all data on the hard disk is deleted and the hard disk is then reformatted.
You should not worry, however, because it is possible to initialize a hard drive without losing any data. In this article, you will learn how to initialize a hard drive without losing data. We also recommend using the Tenorshare 4DDiG data recovery software in case you accidentally delete files.
Part 1: Reasons for unknown or uninitialized errors
There are a few different scenarios that can cause the error message "unknown or not initialized" to be displayed. It is possible that a virus has caused the problem, but it could also be due to a damaged hard disk or bad sectors on the hard disk. It is also possible that you have just connected a new hard drive that needs to be initialized, which would be another reason for the error. Initializing your hard drive is necessary to get it back up and running without any problems, regardless of the reason you did it.
There are various reasons why a hard disk may be unknown or not initialized:
- The hard disk was not installed correctly.
- The hard disk was not formatted correctly.
- The data carrier is damaged.
- The hard disk is being used by another device.
Part 2: Is all data deleted when initializing a hard disk?
The answer is "yes" and "no" at the same time. When you initialize a hard disk, the data on the hard disk is not necessarily deleted, but the partition table, in which information about the structure of the hard disk and the file system is stored, is. If you accidentally initialize the wrong hard drive, you will be forced to delete all data that was previously stored on that hard drive. However, if you use a data recovery tool such as 4DDiG, you can recover the lost information.
The data is not deleted when a hard disk is initialized. However, the hard disk is reformatted and all data becomes inaccessible. To delete data, you must first partition and format the hard disk.
How can I initialize a data carrier without losing data?
Before you start initializing the hard drive, you should restore all important files that could be lost in the process. Below is a list of three ways you can initialize your hard drive without losing any data:
- Preparation: Restore files from an initialized hard disk
When you buy a new hard drive, you must first initialize it. This is an important step when installing a new hard disk, as it formats the hard disk and assigns it a drive letter. However, if you do not initialize your hard drive properly, all data on the hard drive may be erased. For this reason, it is important that you create a backup of all important files before initializing your hard drive. However, if you have already initialized your hard drive and find that all data has been deleted, you can recover the data with Tenorshare 4DDiG data recovery software.
The 4DDiG data recovery software can be used to recover files from an already initialized hard drive, even if the hard drive or partition was initialized by mistake. It offers the following functions:
- Recovery of data from internal and external storage media based on
- Windows and Mac operating systems, including hard disks, digital cameras, SD cards, USB sticks and recycle bins.
- The user interface is simple and straightforward to use.
- Restore over a thousand different file types, including photos, movies, documents and audio files.
Restore files with just three simple actions. - Many preview modes are available to check the specifics of the file.
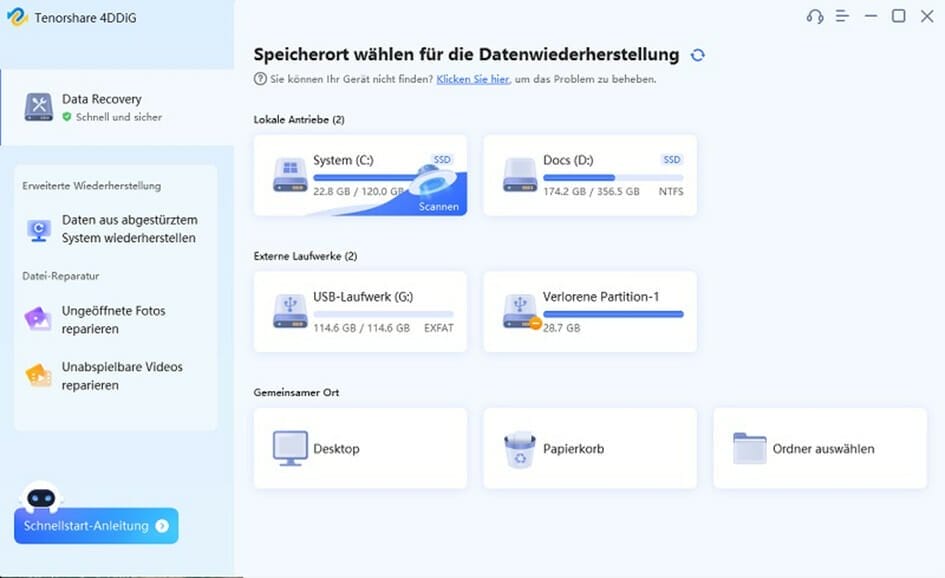
Step 1: Select a location
After you have downloaded and installed Tenorshare 4DDiG on your computer, start the program. Select the uninitialized disk and 4DDiG should scan it immediately.
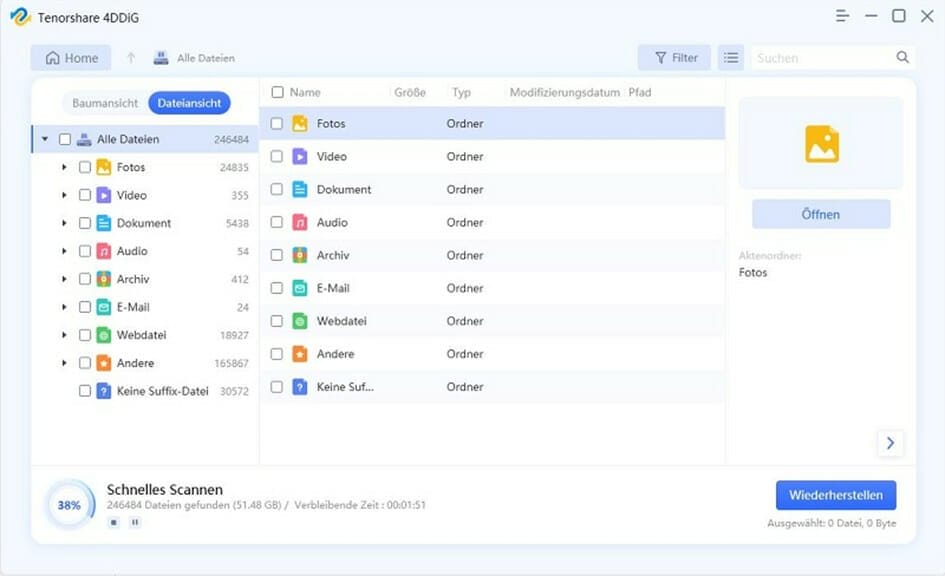
Step 2: Scan the hard disk for files
It should take a while until 4DDiG has completely scanned your selected drive for deleted data. After scanning, you can select the target files for preview.
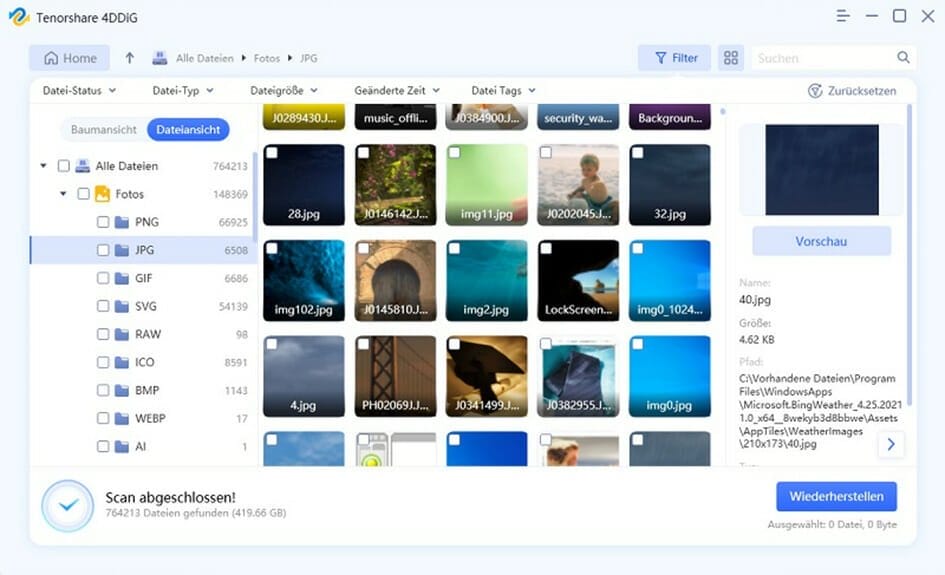
Step 3: Preview and restore lost files
Now you can select the target data and then click on Restore to save it in a safe place!
Initialize hard disk with disk management
Initializing a disk is an important step when installing a new operating system. However, most users choose the "Disk Management" option to initialize their hard disk. However, this method is not recommended as it can lead to data loss.
You can initialize a hard disk on a Windows computer by using the built-in tool called Disk Management, which is available in all versions of Windows. Start Disk Management, right-click on the disk you want to initialize and select "Initialize Disk" from the context menu. To initialize the disk, select the desired partition type and then click "OK".
Initialize hard disk with initialize-disk cmdlet in Powershell
The Initialize-Disk PowerShell cmdlet can be used to initialize hard disks properly. You can initialize a disk using the Initialize-Disk cmdlet in PowerShell, provided you are familiar with using this program. Start PowerShell with administrative privileges and type "Initialize-Disk -Number #" followed by the Enter key, where # is the number of the hard drive to be initialized.
The initialize-disk cmdlet in Powershell allows you to initialize a disk without losing data. This is very useful if you need to install a new disk or repair a damaged disk. Follow these steps to initialize a disk with the initialize-disk cmdlet in Powershell:
Open the Powershell as administrator.
Type the following and press Enter: Initialize-Disk -Number 0
If you have several hard disks, change the number in the instructions accordingly. The number indicates which hard disk is to be initialized.
Wait until the command is completed.
FAQs:
Is data deleted during initialization?
When you initialize a hard disk, the partition table is deleted, but the data on the hard disk is not necessarily removed. This has already been discussed. However, if you accidentally initialize the wrong hard drive or partition, none of the data that was stored on that hard drive or partition will be lost.
When a data carrier is initialized, all data on the data carrier is deleted. This is necessary so that the data carrier can be pre-written. When you initialize a new data carrier, you should therefore ensure that you have backed up all important data from the data carrier.
What exactly does it mean to initialize the hard disk?
The process of creating a new partition table on a hard disk and preparing it for use by the operating system is called initializing a hard disk.
What exactly does it mean to initialize the hard disk? Initializing a hard drive is the first step when setting up a new computer or replacing a hard drive. Initialization creates a new, blank disk on which the operating system can be installed. If you are inserting a new hard drive into your computer or replacing an old hard drive, you must initialize the hard drive before you can install the operating system.
How do you initialize the hard disk and which partition style do you use?
Depending on your requirements, you can initialize a hard disk either with the Master Boot Record (MBR) or the GUID Partition Table (GPT). Both styles are available. MBR is backwards compatible with older versions of operating systems, while GPT is required for hard disks with a capacity of more than 2 terabytes.
The hard disk must first be initialized before you can select a partition style. You can initialize the hard disk in Windows by going to "Computer" and then right-clicking on the hard disk you want to initialize. Select the "Initialize" option in the context menu. This will open the "Create or delete hard disk partition" dialog box. Click on "OK" in the dialog box.
Conclusion
When you back up your data, one of the most important steps is to initialize each hard drive. If you are using a new disk for the first time, format it first and then create a new drive or partition on that disk. This will create a completely new structure for your data that cannot be damaged. You can then save all the data you want on the newly created data carrier. If you want to initialize a USB flash drive, an external hard drive or an SSD, you should first perform the steps listed below, regardless of whether the device is brand new or has already been used. Be sure to back up your files before formatting or partitioning a USB flash drive, external hard drive or SSD, regardless of whether the device is brand new or already in use.
Using Tenorshare 4DDiG is the most effective way to initialize a hard drive without losing any data. Your data is backed up on multiple levels with this method so that none of it is lost.

On Windows Tweaks you will find time-saving tech guides for PC, software & Microsoft. For a stress-free digital everyday life. Already We have been tweaking Windows since 1998 and just don't stop!
