
Quick overview:
Deactivate automatic updates in Windows 11 / 10
In the next steps, we will tell you how to pause, suspend or completely deactivate all Windows updates in Windows 11 and Windows 10.
We will show you different methods to prevent Microsoft updates in the background.
However, you should only deactivate automatic updates if there are problems or good reasons for doing so, and reactivate them as soon as possible.
Let's go.
Deactivate Windows 10 and Windows 11 updates for 7 days (update pause)
The quickest and safest way to turn off updates: suspend them for a short time.
This update pause has been available since Windows 10 and also works with Windows 11:
- Klicken Sie auf den Startknopf und dann auf Einstellungen. Weiter geht's mit einem Klick auf Update und Sicherheit.

- Then click on Update pause for 7 days:
- Done! Now it's quiet for a week with the updates.


Permanently disable Windows updates in Windows 10 and Windows 11 (2 methods)
An "update pause" is not enough for you - would you like to prevent updates permanently?
Use the following two aggressive methods to force the permanent deactivation of the update function in Windows 11 and 10
Disable Windows Update service permanently (method 1)
These instructions should really only be carried out by professionals - and should also be reversed later for your own safety.
Step 1:
While holding down the WINDOWS key (on your keyboard), tap the R key. A dialog box now appears in which you type services.msc. It will then look like this:

Step 2:
After clicking OK, a long list of Windows functions (also known as "services") appears. Now scroll to the end and look for the Windows Update entry:

Step 3:
Double-click on the Windows Update entry and select the startup type Disabled under General.
Step 4:
Switch to the Recovery tab and set the values for First error, Second error and Further errors all to Do not perform any action.
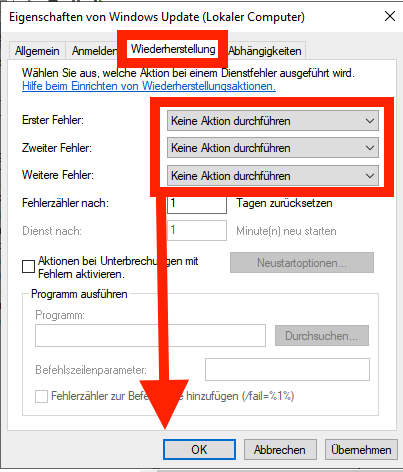
Now click on OK. Done!
Permanently prevent Windows 10 / 11 update via registry (method 2)
With the above method, will the Windows update still restart after a reboot?
You can then take an even more aggressive approach by overriding Windows Update via the heart of Windows - the registry.
Backup recommendation: Editing the registry is risky and can cause irrevocable damage to your installation if something goes wrong. We therefore recommend that you make a full backup of your computer before proceeding. Tip: You can easily back up your Windows data in just a few steps with this backup software.
Here are the instructions to prevent updates via the registry editor:
Step 1:
Hold down the WINDOWS key (on your keyboard) and tap the R key. A dialog box now appears in which you type regedit. It will then look like this:

Step 2:
Click OK to start the registry editor. Now navigate to the following folders one after the other:
HKEY_LOCAL_MACHINESOFTWAREPoliciesMicrosoftWindows
Right-click in the right-hand area of the window and select New and Key . Like this:

Name the new key (which looks like a folder) WindowsUpdate. Press Enter. Now right-click on the new WindowsUpdate key again and select New and Key. Give the subkey the name AU.

Step 3:
Now right-click in the right-hand window and select New and DWORD-Value. Give this value the name NoAutoUpdate. Double-click on it and enter 1. At the end it will look like the picture above. That's it! Windows Update is now completely deactivated.
Restart the PC now.
Video tutorial: Permanently disable automatic Windows 11 update
In this video you will see step by step the two methods described above for complete and permanent update deactivation under Win 11:
Ingenious free tool: Windows Update Blocker for Windows 11 & 10
The Windows Update Blocker is a small, free tool that you can download here directly from the software manufacturer Sordum.
With the Windows Update Blocker, you can manage the update service on Windows 11 / 10 (and older) via a simple user interface.
And you can select the respective update services individually and activate or deactivate them as required.
The freeware tool does not need to be installed:
Simply save the program files, for example on an external device (e.g. USB stick), and you can start it.
One shortcoming, which is probably bearable for most users:
The Microsoft Store is sometimes unavailable as long as the Windows Update Blocker blocks the update services. The solution: Activate the updates in the tool for a short time, then use the Microsoft Store and then deactivate the updates again.
1. instructions for the Windows Update Blocker (quick)
After downloading the Windows Update Blocker, unpack it in a directory and start it. The status of the Windows Update service is displayed via an icon.
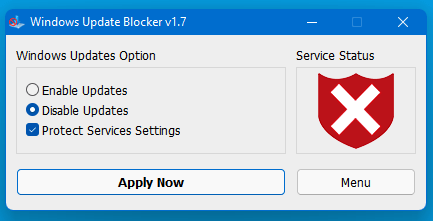
Would you like to block automatic Windows 10 / 11 updates?
Then select "Deactivate updates".
The option to protect the service settings and prevent unwanted changes should also be ticked.
Then click "Apply now".
2. instructions for blocking individual services via Windows Update Blocker (comprehensive)
Genius: With the current version of Windows Update Blocker, you can add any service to the Wub.ini file in order to block it.
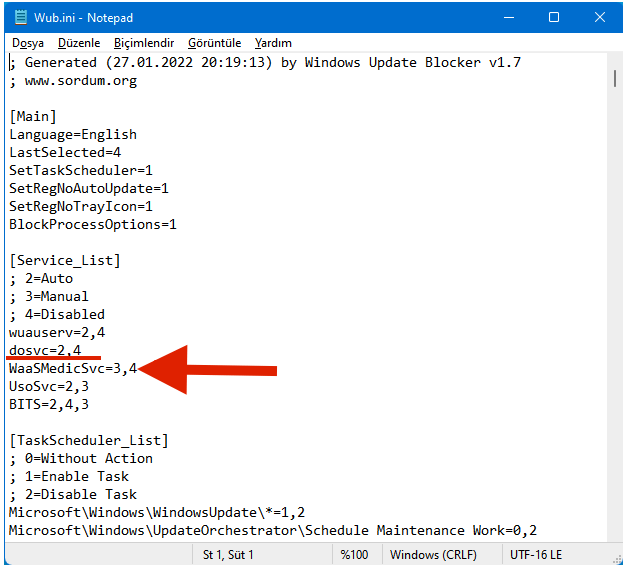
First edit the Wub.ini file and add the desired service name under the line "dosvc=2,4".
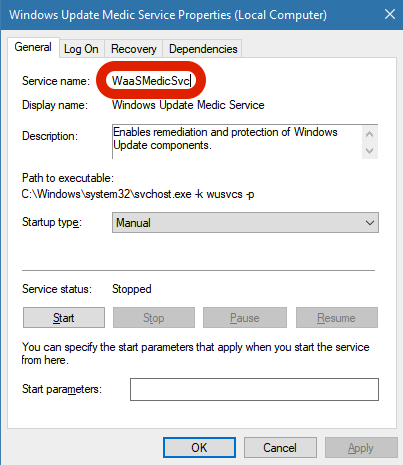
Here is a guide if you want to block the "Windows Update medic Service".
Open the "Services" app (simply type in the Windows search field) and search for the desired name:

Click on it and copy the service name:
Now open the wub.ini file in the Windows Update Blocker folder. There, add the name of the service under the line dosvc=2,4, see illustration:
Now start the Windows Update Blocker and click on "Apply now".
From now on, Windows 10 / 11 will not perform any updates for the inserted service.
And what if I want to reactivate Windows 11 / 10 updates again?
Then delete the added services again - proceed as follows:
- Open the Windows Update Blocker and select the "Activate service" option, then click on "Apply now".
- Remove the respective service line from the Wub.ini file.
- Now you can select "Deactivate service" and "Protect service settings"
3. service list options & troubleshooting in the Windows Update Blocker
In the Windows Update Blocker menu, you will find the "Service List Options" option.
When you click on it, the "Service List Options" pop-up window opens.
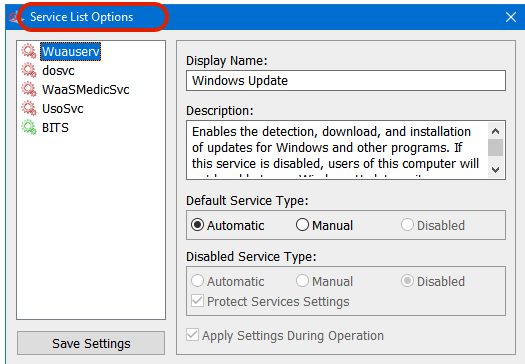
Use this user interface to control and manage all services that you have added in the Wub.ini in the [Service_List] area (see screenshot above).
A maximum of 25 services can be added to Wub.ini and displayed and edited here.
However, the Wuausrv service can only be displayed, but not edited.
Important for the back of your mind in case of problems with the Windows Update Blocker:
If the Windows update service does not start or another problem occurs even though you have activated Windows updates for Windows 10 / 11, a system start usually helps.
Even if Windows updates are disabled in Windows 11 / 10, some Windows processes or apps sometimes still try to open and repair Windows updates.
Theoretically, Windows updates can be damaged in the process.
Start the Windows 11 / 10 update troubleshooter from Microsoft if updates cannot be opened despite a system restart.
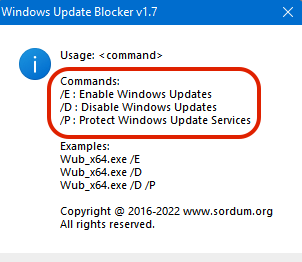
The Windows Update Blocker supports the following command lines for the automation of Windows Update Blocker tasks:
Install Windows 10 & 11 updates manually
Automatic updates are now completely disabled for the time being: However, you can continue to install updates manually or be notified of new updates for now.
How it works:
Get notified before updates
You can also instruct Windows to notify you of updates before they are downloaded and installed. This saves time and keeps you in control. This is how it works:
- Click on the start button in Windows and type in gpedit.msc:

- Then click on Consider group policy.
- Open the following folders one after the other: Computer Configuration -> Administrative Templates -> Windows Components -> Windows Update.
- Now double-click on Configure automatic updates.

- Now select option 2: Notify before download and automatic installation.
From now on, you can install updates manually.
Open the Windows Update window as described above.
Can I safely disable Windows 11 / 10 updates?
Our advice: No, not permanently! You should really only deactivate the Windows 11 / 10 updates and the associated Windows updates in exceptional cases.
If you switch off Windows Update for a longer period of time, you are putting yourself, your PC and therefore your data at risk.
One wrong move online or a contaminated USB stick can then be enough to infect the computer.
Beginners should therefore only switch off the Windows update in the following scenarios :
- If you have a major problem with the updates (e.g. in the form of a blue screen after an update).
- If you need to 100% rest from updates - and then turn the updates back on later.
The cause: Why do Windows 11 and Windows 10 update automatically?
Updates in Windows 10 and Windows 11 sometimes bring with them numerous new functions:
This is how they plug security gaps, fix crashes or add new functions to the operating system.
There are therefore different types of Windows updates in Windows 10 and 11:
Critical updates
These are often security updates or critical bug fixes that plug serious errors or security gaps in Windows.
Defender definition update
This updates the Windows Defender database so that you are protected against viruses and other malware.

Driver updates
Updates device drivers in the background that are responsible for the functioning of various devices (see also section below).
Cumulative updates
Larger update packages that contain many smaller updates. They are usually several hundred megabytes in size and take several minutes to install.
Update/Hotfix
Single update that fixes minor problems. Is rarely distributed individually via Windows Update, but usually only as part of a cumulative update.
All these updates have one thing in common: in the worst case, they can cause a restart or, in the case of driver updates, even lead to interruptions in the Internet connection or a black screen.
Microsoft's backdoor: Automatic updates in Windows 10 and Windows 11
Automatic updates in Windows 10 or Windows 11 always happen exactly when you don't need them at all.
And if you want to stay with Windows 10, you should prevent the upgrade to Windows 11. Microsoft could install this through the back door at any time on compatible PCs and laptops via its automatic updates.
Even if, according to official Microsoft statements, this should not happen without being asked. However, it is not ruled out for the future.
And now to the crucial question:
Prevent upgrade from Windows 10 to Windows 11
Windows 10 users with compatible devices have not yet been forced to upgrade to Windows 11. But they will receive an "invitation" to the operating system update via the forced PC Health Check installation (with the update KB5005463), which will be displayed in the update settings from now on.
This already increases the risk of a Windows 11 upgrade accident due to an accidental mouse click.
Those who are afraid of the Windows 11 upgrade due to the still widespread bugs, incompatibilities and lack of stability should therefore be careful and - if absolutely necessary - prevent the update by taking the measures mentioned.
Conclusion: Only switch off updates permanently in an emergency
With Windows updates switched off, you may be exposed to dangers and miss out on important drivers, bug fixes and security updates.
You should therefore only suspend updates under Windows 11 and 10 in the worst case scenario or install them manually if necessary.
FAQ
A summary of all the important questions and answers here:

On Windows Tweaks you will find time-saving tech guides for PC, software & Microsoft. For a stress-free digital everyday life. Already We have been tweaking Windows since 1998 and just don't stop!

Quick addition to method 1: You should also select the "Do not perform any action" option everywhere under the "Restore" tab. Otherwise, the service will restart automatically after a certain time and the spectacle will start all over again. I know this from painful personal experience ^^
Thank you for this addition 🤝 We have updated the article and added this note to the instructions above 🙂
Hello, unfortunately method 2 only worked to a limited extent or not at all on my computer. After 14 days, the next (unwanted) update was installed again.