
Quick overview:
Service Pack 2 brings with it some problems with external devices (hard disks, CD/DVD-Rom drives or USB sticks), which are solved as follows:
1. In some cases, it helps to connect, disconnect and reconnect the external device.
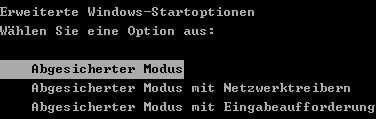
2. a) During startup, press the F8 key directly before the Windows XP start logo and select Secure mode.
2. b) Now right-click on the workstation (see Start menu) and select Properties. Switch to Hardware and open the Device Manager. Now expand DVD/CD-ROM drives or Drives (hard disks), right-click on the problematic entry and select Uninstall. After a restart (in conventional mode), the drives will mount themselves again automatically.

3. Visit the manufacturer's website (or search at Google.de) of your devices and try to get a newer driver (e.g. from August 2004, Service Pack 2 release) and install it.
Windows XP SP 2 - Re-implement external drives
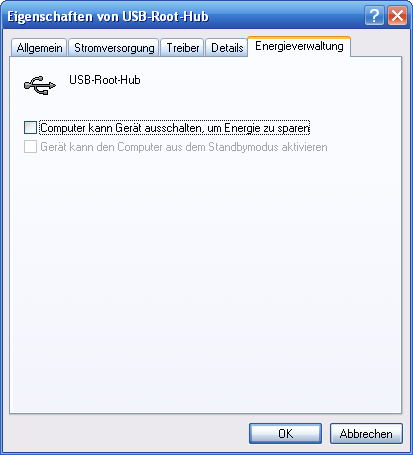
4. Service Pack 2 has problems with the power management of some external devices: Open the Device Manager again and open each entry with the name "USB Root Hub under "USB Controller. Under "Energy management, remove the checkmark in front of "Computer can switch off device to save energy.
5. Since Service Pack 2, write protection has been implemented for external drives, which can be used in companies, for example, to prevent data from being stolen. Unfortunately, this write protection also prevents the correct display of the devices in the workstation or in various applications in some cases. To solve this, click on "Start/Run and type "regedit. Open the path "HKEY_LOCAL_MACHINE\System\CurrentControlSet\Control\StorageDevicePolicies and double-click on "WriteProtect. Enter a "0 and confirm with "OK.
Note: If the key does not exist, create a new key under "HKEY_LOCAL_MACHINE\System\CurrentControlSet\Control create a new key called "StorageDevicePolicies (right-click, "New/Key). Now click in the right-hand pane, select "New/DWORD value and name it "WriteProtect. Now enter the "0, confirm with "OK and restart your computer.
6. It is possible that the drive letter is already assigned. Click on "Start/Run and enter "diskmgmt.msc and right-click on the external drive. Select "Change drive letters and paths. Click on the "Change button. Under "Assign the following drive letter, select a higher letter (e.g. M) and confirm. The devices should be displayed again after a restart at the latest.

7. Using the Registry Editor, open the path "HKEY_LOCAL_MACHINE\SOFTWARE\Microsoft\Windows\CurrentVersion\policies\Explor er and make sure that no value named "NoDrives exists in the right part.
Hidden drives can also be displayed or made visible again via TweakUI (Download). To do this, install and start the tool. Click on "My Computer/Drives and make sure that all drive entries are ticked.
NOTE FOR NEW PUBLICATION: This article was produced by Sandro Villinger and comes from the Windows Tweaks archive, which has been built up since the late 1990s.

On Windows Tweaks you will find time-saving tech guides for PC, software & Microsoft. For a stress-free digital everyday life. Already We have been tweaking Windows since 1998 and just don't stop!
