Quick overview:
Basic idea
When you right-click on the "My Computer" icon, you get a context menu with more or less meaningful entries. The basic idea was to add your own extensions to this context menu by modifying the entries. You can also take the opportunity to manually clean out this menu, as this key is often misused by providers to establish themselves in the system.
During my research on the Internet, I came across several articles on the subject whose procedures and results did not satisfy me. The paths were too branched, were deleted or otherwise overwritten by RegCleaners or simply did not work. In search of a solution in an exposed and comprehensible position, this path was created.
This procedure and its results were tested on Windows XP (Home & Pro; with & without SP's) and VISTA (representative Ultimate).
Note: The following applies to all work in the registration area: First save the key that you want to modify or even remove!
Preparation
In advance, we think about what entries we want to include in the context menu. For example, paths to frequently used folders or programs, to the root paths of hard disks or to folders with collections (MP3 or movies etc.) make sense. We now copy these paths directly from the Explorer into a text file (here "Paths.txt" as an example). This saves the time-consuming search on the computer when the registry is open: everything in one place.
If programs are to be opened, you should consider whether they are provided with parameters or use parameters. These parameters would then have to be noted at the same time. We can then practically run such calls completely with one click.
Procedure
The tools
I use the registry editor of TuneUp Utilities 200(x) for my work in the registry. This has the advantage that bookmarks can be created for the edited keys. A very practical feature for frequent changes. However, everyone can choose which tool they want to use. The basic principle remains the same.
Most people will probably use the RegEditor from XP. This can be conveniently called up with [Win]+[R] --> regedit --> ENTER.
To have an example, I created a test folder in C:TestFolderData, which I will refer to in the following.
The right key
After opening the registry, we look for the key HKEY_CLASSES_ROOTCLSID{20D04FE0-3AEA-1069-A2D8-08002B30309D}
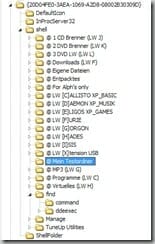
In its original state, this contains the subfolders DefaultIcon, InProcServer32, shell and ShellFolder (image 1).
We now right-click on this key and select Export. This gives us the option to return to the original state if something goes wrong.
We are concerned with the shell folder, which contains the entries find (entry Search... in the context menu) and Manage (entry Manage).
Each subfolder that is created here appears immediately under its assigned name in the context menu of Workplace.
In order to bring a certain order to the keys, I recommend starting them with a specific letter or special character that is always the same. I have chosen an @. This way, the self-defined keys always remain the front ones in the folder.
In the right-hand window of the shell subfolder, I have created a key of the type String with the name Comment and the content "All keys with the @ character are self-defined. [Date] AranankA" are created. Comments of this type can be created arbitrarily and without any effect on the system. They make the content traceable later on.
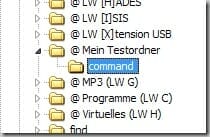
We now create an empty key by right-clicking on the shell folder icon and selecting New --> Key. We call this "@ My test folder" (image 2).
Setting up the first additional key
Right-clicking on the workstation icon already produces a result (Fig. 2a), which at most produces a system warning when clicked on (Fig. 2b).
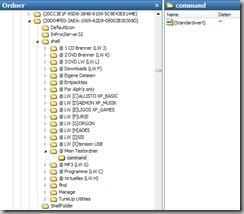
Next, we set up a key with the name command in the folder "@ My test folder" that we have just created (Figure 3). This name is not freely selectable!
If we now click on this key and take a look at the right-hand side of the editor, we will find an entry there: A key of the type string (REG_SZ) with the name "(default value)" and the entry "(value not set)". If we try to delete this, this procedure is denied.
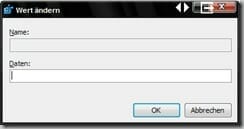
In this right-hand window, we now create a new value again by right-clicking: Type REG_EXPAND_SZ (extended string) with name (default value). We leave the Data area empty (image 4).
Hinweis: Unter dem Standardeditor in XP heißt der zu erstellende Wert "Wert der erweiterbaren Zeichenfolge" Es ist wichtig, das der Typ auf jeden Fall REG_EXPAND_SZ ist!
Diesen neu angelegten Schlüssel „@ Mein Testordner“ exportieren wir nun um ihn zu bearbeiten: Rechtsklick auf den Schlüssel --> Exportieren als „Testschlüssel.reg“. Diese Datei öffnen wir mit Notepad. Wir sehen nun folgendes:
REGEDIT4
[HKEY_CLASSES_ROOTCLSID{20D04FE0-3AEA-1069-A2D8-08002B30309D}shell@Mein Testordner]
[HKEY_CLASSES_ROOTCLSID{20D04FE0-3AEA-1069-A2D8-08002B30309D}shell@Mein Testordnercommand]
"(Standardwert)"=hex(2):00
Den Eintrag "(Standardwert)"=hex(2):00 ersetzen wir nun durch @=hex(2):00, speichern die Datei unter ihrem alten Namen ab und schließen sie.
(Die fertige Datei "Testschlüssel.reg" kann hier runter geladen werden.)
Completion and success
Wieder im Registrierungseditor: Wir löschen den Schlüssel „@ Mein Testordner“. Jetzt doppelklicken wir auf die Datei "Testschlüssel.reg" und bestätigen die Systemrückfage.
Ein Blick in den Registrierungseditor nach einem [F5] zur Aktualisierung:
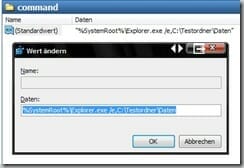
Die einfache Zeichenkette ist verschwunden. Übrig ist die erweiterte Zeichenkette ohne Daten (Bild 5). Diese öffnen wir nun mit Doppelklick und erhalten (Bild 6):
In das untere Feld tragen wir nun den Pfad zur gewünschten Datei ein (Bild 7). Da diese sich in diesem Fall expandiert im Explorer öffnen soll, ist der Eintrag wie folgt zu gestalten:
%SystemRoot%Explorer.exe /e,C:TestordnerDaten
Hinweis: Bei diese Art des Exploreraufrufes muss man die Leerstellen sowie das abschließende Komma beachten!
Dazu nutzen wir die im Vorfeld angelegten Pfade in der Datei „Pfade.txt“.
Das war’s eigentlich! Wir sind fertig.
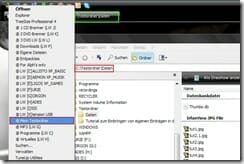
Testen wir nun: Rechtsklick auf Arbeitsplatz --> "@ Mein Testordner" und schon öffnet sich der Windows Explorer genau im Ordner C:TestordnerDaten
Concluding remarks
Die Vorgehensweise ist nun immer die Gleiche. Egal, ob es sich um Ordneraufrufe oder Programmaufrufe handelt. Einziger Unterschied: Bei Programmen wird nicht der Umweg über den Explorer genommen, sondern das Programm direkt aufgerufen. Bei Bedarf mit notwendigen oder gewünschten Parametern.
Den Schlüssel "@ Mein Testordner" sollten wir per [F2] umbenennen. Die Datei "Testschlüssel.reg" können wir dadurch immer wieder verwenden, wenn ein neuer Eintrag benötigt wird. Doppelklick reicht und der beliebig modifizierbare Schlüssel "@ Mein Testordner" erscheint in der Registrierung.
Und dann macht auch ein Lesezeichen zum Schlüssel Sinn...
by AranankA (18/3/2008)
On Windows Tweaks you will find time-saving tech guides for PC, software & Microsoft. For a stress-free digital everyday life. Already we have been "tweaking" Windows since 1998 and just won't stop!


