
Quick overview:
PC computers are often used by many users who have different requirements and habits. The resolution in particular is not only a matter of taste, but is also related to the compatibility of different programs.
Many users prefer the resolution 1024x768 for better readability and (depending on the monitor type) thanks to higher refresh rates, while many choose 1280x1024, which increases the overview. However, software (such as children's programs) also require their own mode (such as 640x480) in order to function correctly. My recommendation Resolution Changer is dedicated to both cases: With a little trick, you can not only select a separate resolution for each user but also change the resolution by double-clicking, start an application and reset the resolution again when the program ends.
How the Resolution Changer works
1. Click on this link to download ResChange. The file is only 48 KB in size!
2. Move these, for example, to the path you created yourself C:\Programme\ ResChange.
3. Now right-click on the desktop and select New/text file. Name this e.g. ResChange Aufruf and open it. Now type in the following command string:
@echo off
C:\Program Files\ResChange\reschange.exe -width=1024 -height=768 -depth=32 -refresh=60 C:\Program Files\DIRECTX\SETUP\dxinfo.exe (Without quotation marks)
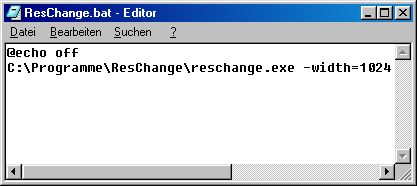
Now save this file under the file name ResChange.bat after you have made an entry under File/Save as... under File type, select the entry All files.
Explanation:
- @echo off specifies that no output should appear. Otherwise you would have to click away a DOS window containing your command each time.
- First, call Reschange.exe, whereby special letters such as ä and spaces in the path specification such as C:\My programs are not permitted.
-width = screen width in pixels, e.g. 640, 800, 1024, 1280, 1600
.
-height = screen height e.g. 480, 600, 768, 1024, 1200
-depth = color depth in bits such as 8 (256 colors), 16, 24 and 32.
-refresh = refresh rate (Hertz) such as 60, 70, 72, 75, 85, 90, 100, 120
- Last but not least, there is the call parameter for another program such as dxinfo.exe, which in our example is started with a resolution of 1024x768, 32-bit color depth and a refresh rate of 60 Hertz. After exiting the tool, the resolution is reset. If you do not specify a program here, the resolution is updated directly and only reset again at your discretion. This is also the key to setting individual resolutions for different users. Windows 98 supports different resolutions for each user, although this does not work perfectly in all cases. With ResChange.exe you are on the safe side:
Log in under the desired user name and move the ResChange.bat to the Autostart folder under Start/Programs. When the system starts or after entering the user name and password, this file is executed and the system automatically switches to the desired resolution. Now that you know how to change the resolution, you can give all users different resolutions.
If the arrangement of the icons on the desktop changes due to the resolution change, this problem can be solved with the program "Save my Desktop" (for all Windows versions). You can get the file (257 kb) here at PCWorld.com. It saves the current arrangement of the icons and restores them if necessary!
Important: Always make sure that your monitor supports the resolution, color depth and refresh rate you have entered so that no damage can occur (this is particularly dangerous with older monitors). Always take a look at the manual or the manufacturer's website for the monitor - as a general rule, all resolutions and color depths that you can find in the display properties under Control Panel/Display/Settings and all refresh rate entries, which can also be found under More options/Graphics card, can also be used.
NOTE FOR NEW PUBLICATION: This article was produced by Sandro Villinger and comes from the Windows Tweaks archive, which has been built up since the late 1990s.

On Windows Tweaks you will find time-saving tech guides for PC, software & Microsoft. For a stress-free digital everyday life. Already We have been tweaking Windows since 1998 and just don't stop!
