
Quick overview:
Our user Martin G. and Windows-Tweaks welcome you to this in-depth workshop. You will learn some exciting things about the possibilities of the taskbar that will make your life with Windows easier and bring an effective touch to your home desktop:
- Integration of shortcuts in the taskbar and their correct display (Chapter I)
- Integrate links to the Windows commands Shutdown, Logout etc. into the taskbar and display them correctly (Chapter II).
Below you can see the table of contents. In the course of the workshop I will often refer to other places, all of which are listed here. Just click on a chapter to go there.
- Note: There are small pictures throughout the workshop to help you understand the steps. You have to click on some pictures to see them in full view.
- Note: Notes that deal with the content of this section are displayed like this:
- Note: This is a note!
- We hope you enjoy this workshop! Chapter 1
1.1 Content of the chapter
1.2 Integrating shortcuts into the taskbar
1.3.Further design for a better overview
1.4.Change displayed symbols
1.5.Change mouse over textBasic requirements: top
Please make sure you have downloaded the following program. I'll come back to it later:
- AWIcons (www.awicons.com)
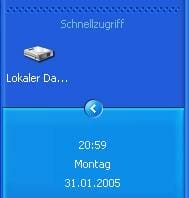
Now that you are starting, your desktop should look something like this (depending on which programs you have):

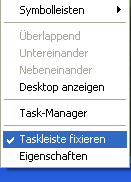
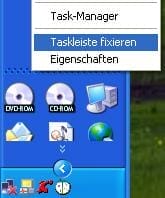
The first thing you should do now is to right-click anywhere on the taskbar and select the "Fix taskbar" entry in the menu that appears.
Now click with the left mouse button (as shown below) in the free area between the Windwos logo and the displayed programs. Try to hit the red dot (only visible in the picture), keep the left mouse button pressed and move the whole thing to the outer left edge.
![]()
If you have done all this, it should look like this:

At the end of the workshop there are some tips on how to experiment with this taskbar (on the left-hand side of the screen).
We only move the taskbar to the left edge so that things are easier to demonstrate. Of course, the whole thing works just as well when the taskbar is in the "normal state", but please follow these steps as it is easier to explain this way.
Chapter 1:
1. content of the chapter: to the top
What is done in this chapter?
This chapter is, so to speak, the introductory chapter, here it is only about (of which you may already understand something, if not - would not be particularly bad, that's what this workshop is about) to integrate shortcuts, for example to your music folder or to your CD Rom drives in the taskbar and to show them correctly.
Please make sure that everything has been executed as described above.
Good, then we can start with point 2.
2. integrating shortcuts into the taskbarto the top
First of all, you need a new folder. It doesn't really matter where this is located, you just need to know where it is.
Note: Shortcuts I mention in this workshop always refer to standard drive names and standard folders, but I specifically point out when there might be differences in them. My hard disk has the letter "C:". If this is different for you, then of course enter your hard disk drive letter, e.g. "D:", instead of "C:".
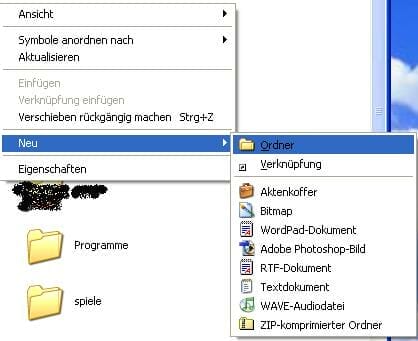
Just create this folder. In my case, it is located in the "C:" drive (my hard disk). You can easily create a folder by switching to the folder in which the folder should be located and clicking anywhere in the free space of the folder with the right mouse button. Select "New" from the menu that appears and then click on "Folder". You can now rename the new folder as you wish, I suggest "Quick access". Please remember the exact name of the folder and where it is located. In my case it is in this directory: "C:\Quick Access". This is what it will be called in future, even if it has a different path. So use this folder for quick links in the taskbar in future.
Now we create the first shortcut in this folder, therefore:
Double-click in the folder and right-click somewhere in the (still) free space in the folder and click on "New" in the menu that appears and then on "Shortcut".

Now you come to a Windwos dialog, where we first click on "Browse", and then select the hard disk (by default this is "C": but as I said, other PCs, other names, so just use your normal hard disk.)

Now please enter the name of the whole thing, we can also leave it at the default name. Click on "Finish" and you're done.

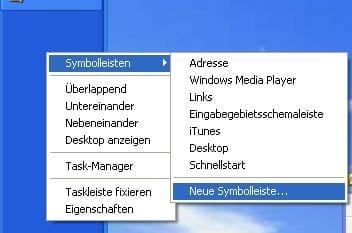
Now we come to the first important part, we are integrating the whole thing into the taskbar for the first time. To do this, right-click on the taskbar again, select "Toolbar" and then "New toolbar".
The whole thing should now look something like this:
If you click and hold the left mouse button on the dotted area above "Quick access", you can move it up and down. You can of course also enlarge your taskbar (which is now on the left) to the right. Simply left-click on the area that is furthest to the right on the taskbar and move it with the left mouse button.
This is how it would ideally look now:
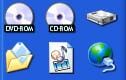
You should now create 2 more shortcuts to try the whole thing out, I have simply chosen my DVD drive and the folder "My Documents", how this works should be clear. (Simply repeat the steps above (from here) and instead of "C:" simply select the folder "My Documents" and a drive). These shortcuts should of course be in your folder with the other shortcut so that they are also displayed on the taskbar. You can of course continue with shortcuts to other folders and drives, but in this workshop I will use the shortcuts to "C:", the "My Documents" folder and my DVD drive, and therefore advise you to do the same.
Note: as you will have noticed, all files in the selected folder will now be displayed on the taskbar.
This is how it should look now:

You can now enlarge the taskbar to the left as required so that all objects are displayed correctly.
Note: As you may notice, the CD/DVD drive now shows the symbol of the inserted CD/DVD. You will find out how to change this in a moment.
This completes the first part. Now the "cosmetic work" begins
3. further design for a better overviewto the top
Now let's see how we can embellish the whole thing. To do this, let's right-click somewhere in the free area in your "quick access area". This menu should appear:
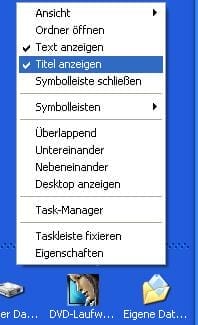
Now for a quick explanation:
- Under View there are large and small symbols to select, we will come to this later.
- Opening a folder is not important for us
- If you uncheck the "Show text" box, the titles under the icons will be removed. The whole thing now looks much clearer and more compact.
- If you uncheck the box under "Show title", the heading will also be removed. You can do this, but you don't have to. But in my opinion it looks a bit more like it would fit into Windows. You now have room for 3 more icons. Note: You can of course also extend your bar downwards to make room for more icons. However, I will now reduce the size of the bar and continue working with 3 icons.
- "Close toolbar" should never be used. This will remove the area from the taskbar.
- Under "Toolbars" you will find access areas that you can display, your "Quick Access Toolbar" is marked with a tick. If it is unchecked, it will be removed from the taskbar.
- All things below are unimportant for the time being.
If you have now unchecked the two checkboxes, it should look like this:
4. change displayed symbolsto the top
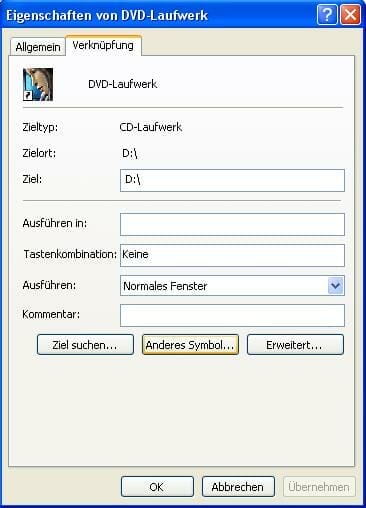
First of all, we change the icon for the CD/DVD drive. To do this, we first go back to the folder in which the shortcuts are located, right-click on the shortcut and select "Properties".
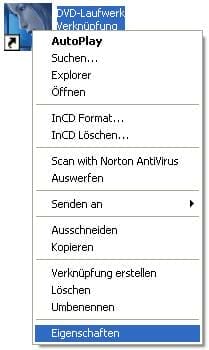
In the tab that appears, please click on "other symbol".
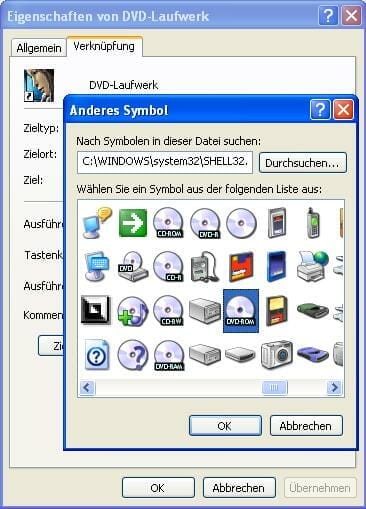
Under "Search for symbols in this file", enter the following: "%windir%\system32\SHELL32.dll" You will now see the most frequently used symbols in Windows:
Note: In the directory "%windir%\system32\" there are other dll. Files that contain symbols that can be used. Below is an explanation of how to create your own icons using AWicons.
We will now select a new icon for our DVD/CD drive:
If you have a CD drive instead of a DVD drive, you can of course also select the symbol for it.
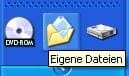
Next, we select icons for the other 2 icons in the same way (if desired). If you later link folders such as music, you can select additional icons from the "Shell32.dll" file.
5. change mouse over textto the top
If you now move your mouse pointer over the shortcuts in the taskbar, a standard Windows message appears with the file name.
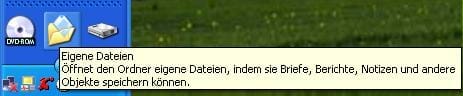
This doesn't really look very imaginative at the moment. Instead, we'd rather have mouse-over messages like in the Start menu. This time using the example of the shortcut to "My Documents". To do this, we right-click on the shortcut and then select Properties as before. This time we select the Comment field and enter the following text:
"Open the My Documents folder, where you can save letters, reports, notes and other objects."
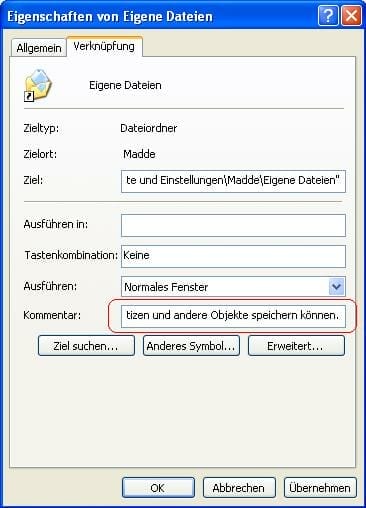
Please confirm now with "Apply"
.
Of course, you can also use any other text, but since this is the Windows standard for "My Documents", we'll just use this one. The whole thing should now look like this on mouse-over:
This brings us to the end of the first chapter. You can now continue to experiment with what you have learned and, for example, expand the folder like this:
Of course, the whole thing looks better if you fix the taskbar, because then the annoying borders disappear. Usually, the area you have on your taskbar is displayed as if it does not fit properly due to the dotted border in the unfixed view, although it fits well in the fixed view. Therefore, you can reduce the size of these areas as shown below and they will still be displayed correctly.
You can now take some time to experiment with the whole thing. But for now, let's move on to the next chapter.
Chapter 2
1. content of the chapterto the top
This chapter is about adding shortcuts to the taskbar in order to shut down, log off and restart the PC with a click on the taskbar. The knowledge imparted in the first chapter is of course a basic prerequisite.
In this chapter I will not explain everything in as much detail as in the previous one, most of it should be clear, and so you can concentrate better on the essential things, should there still be problems, there are usually links where you can read the topic above again.
2. the file "shutdown.exe"to the top
In this chapter, we will look at the "shutdown.exe" file, which is normally located in this directory: "C:\WINDOWS\system32\". Of course, this varies from PC to PC, but in many Windows components we can simply work with "%windir%" for the Windows folder, the PC then adds the drive letter and folder automatically. So in future we say it is in: "%windir%\system32\". Let's first take a look at the options offered by this file (incidentally, this is the file that you also use to switch off the PC in the Start menu with "Shut down"). To do this, we call up the command line version of Windows (Start -> All Programs -> Accessories -> Command Prompt).
Now, to find out more about the file, we enter the path to the file and append a -? to it So: . "%windir%\system32\shutdown.exe -?"
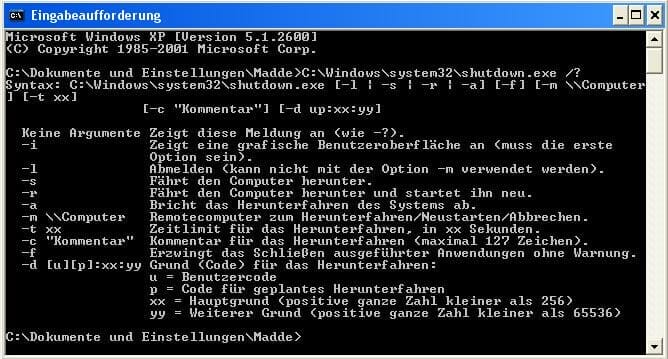
For the clueless among you: This tells us what arguments can be attached to the files and what effect they have on them. Calling the file "shutdown.exe" would have no effect at all. These attachments can be thought of as values that are transferred to the file when it is executed with this extension.
A short list of what you can do with these extensions:
- After the "Syntax" you can see how the attachments to the file must be structured in order to achieve the desired result. The various attachments are explained below.
- "No arguments" means that the file was started without arguments. As already mentioned, this brings the user absolutely nothing, apart from the pleasure of having executed the file "shutdown.exe" once in vain. The following arguments then bring the user significantly more
- "-i" displays a graphical interface that is normally intended for network administrators. But to all students who, like me, have a completely incompetent teacher as network administrator (I hope Mr. Pfaller doesn't read this 😉 ) with this code you can do some wonderful things in a badly set up network (shut down the PC of the teacher who was supposed to give you a computer science course,...). But I won't tell you any more here. Just this much: You don't need to add any more arguments after "-i". It would simply be pointless, as they would have no further effect on the file. But as I said, it is quite possible that some people take a primitive pleasure in attaching pointless arguments to files. So much for that in any case. To execute the file with the graphical user interface, its path would have to be: "%windir%\system32\shutdown.exe -i".
- "-l" as an argument logs out the current user and the PC returns to the user selection window. This will be one of our symbols.
- "-s" shuts down the computer as normal. This will be our first shortcut.
- "-r" restarts the computer. This will be our second shortcut.
- "-a" is quite a useful attachment if you accidentally shut down your PC. However, it is practically never used, as it is very difficult to quickly click on this file when shutting down the PC normally. However, if a time delay is activated (as is normally the case with "-r", "-l", and "-s" without further arguments), you can easily interrupt the shutdown with it.
- "-m" is at most useful for network administrators or wanna be hackers. I rather recommend the graphical user interface ("-i"). However, there may well be situations in which starting via the command line version makes more sense.
- "-t xx" is important for us, as t (i.e. the time delay) is normally set to 15 here, and therefore there is a time difference of 15 seconds between clicking on the icon and the actual shutdown. We will use 00 instead to disable this effect. For network administrators, this feature can be interesting if they want to include a reason before shutting down, but a warning to all wanna be hackers out there: The shutting down computer will see who gave the command to turn off its PC, not to mention that these actions are usually eavesdropped).
- "-c" Outputs a comment in a window on shutdown. This is of course the same window where the time is displayed, so if "-t" is set to "00" it will not be displayed. At most interesting for network administrators, the most we can do with what we want to achieve is to display a "bye bye", but I doubt the point of that now. However, if you insist on getting a nice comment from your PC before shutting down, please don't forget to increase "-t", otherwise the whole thing will not be displayed.
- "-f" is quite a useful argument if you have many programs that complain to you every time they are shut down. They are then terminated without warning. You are of course free to append this argument, but I will not include it.
- "-d" in the reasons could interest us at most p, as there is the "scheduled tasks" function in Windows, in which you can also execute the "shutdown.exe" file with its extensions according to a special schedule. However, this only works with the additional argument "p" under "-d". This is a problem inWindows that was only solved in a later service pack.
Now we have the theoretical knowledge to use this file correctly.
3. installation of the linksto the top
We want to have three shortcuts in the start menu. One for shutting down, one for restarting and one for logging off. First of all, the one for shutting down:
As described in the first chapter, we first create a new folder (we can call it Schnellshutdown, for example) and ensure that it is displayed in the taskbar. In this folder we add the shortcut to the file "%windir%\system32\shutdown.exe -s -t 00". This time you do not need to use drive letters as Windows automatically recognizes "%windir%". We simply call the new file "Shutdown".
If you have done everything correctly, a bar will appear in your taskbar that looks something like this:

We now quickly remove the title and heading, as described above, after which the whole thing should look like this:
![]()
Note: To be able to edit the taskbar elements, the taskbar must not be fixed.
We'll take care of things like symbols and mouse over text soon. For now, let's create the link to restart the program, we'll do the same as above, only this time the path is called "%windir%\system32\shutdown.exe -r -t 00" and we call it "Restart".
Now a shortcut for logging out. The path to it should be: "%windir%\system32\shutdown.exe -l -t 00", we proceed in the same way as in the two examples above, but this time we call it "Logout".
The whole thing should now look like this in the taskbar:
![]()
4. avoid displaying windowsto the top
If you have already tried one of the shortcuts, you may have noticed that an annoying window pops up when the shortcut is executed. We want to prevent this first. To do this, we now perform the same step for each of the 3 files:
Right-click on the link and select "Properties". Now we select the "Layout" tab and click on it.

Now we enter the value 1 in all values marked in red and confirm with "Apply". The window should no longer be visible the next time you run it.
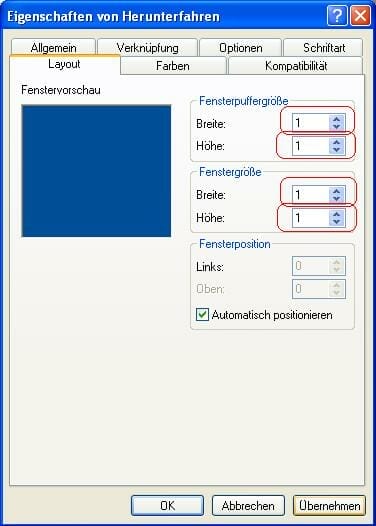
Don't forget to carry out this step for all 3 files.
5. "Cosmetics"to the top
Finally, we should select normal icons and give them nice mouse-over texts. In the next section, we will come to how to select your own icons for these 3 links with the help of the AWIcons program.
First, right-click on the file again. Then select "Properties" and click on "Other icon" in the "Shortcut" tab. You can safely ignore the warning that may appear. Select suitable icons for the 3 shortcuts. It is best to use the three standard icons on the right-hand side of the selection menu.
As mouse-over texts for the three icons, it is best to use:
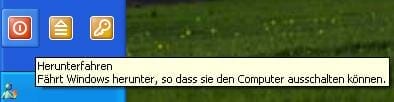
For shutdown: "Shuts down Windows so that you can turn off the computer."
For restart: "Shuts down Windows and then restarts it."
For logout: "Closes all programs and ends the Windows session."
This is how it should ideally look now:
Note: As already mentioned, there are other symbols hidden in many other .dll files in the /system32/ folder, which you are welcome to try out if you have enough time.
6. new icons with "AWicons"to the top
If you have downloaded AWicons as described above, you can produce your own Windows icons and also open .dll files to have access to all icons. Simply use the "Open file" function. This allows you to resize the "Restart" icon, for example... Have fun trying out all the possibilities you have with this program. We will continue to use the standard icons that we already use. If you still have any questions or problems, please refer to the online help (http://www.awicons.com/help/awicons/index_ger.html). This actually brings us to the end of the actual workshop. The following section will give you some tips on how to continue.
7. further tipsto the top
Make the taskbar partially invisible
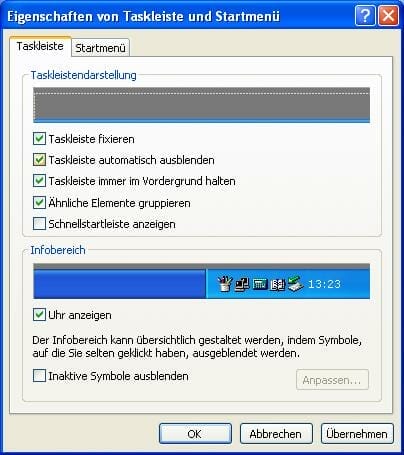
If you have decided to leave the taskbar on the right or left in future, here is my tip for a better overview: You can simply make an inactive taskbar "disappear", it will then reappear when you have moved the mouse pointer to the corresponding corner. Admittedly, this takes some getting used to at first, but it certainly has its advantages. This is how it is activated: Click anywhere with the right mouse button in the free area of the taskbar and select "Properties". In the subsequent menu, check the box next to "Automatically hide taskbar".
Fix taskbar
You can always use this function during this workshop to check what the result will look like.
Normal taskbar and small icons
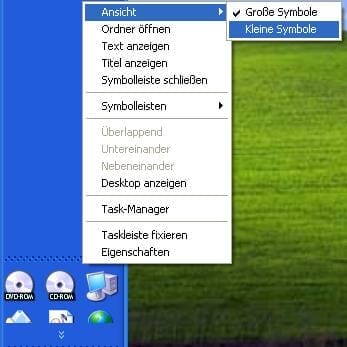
If you don't like the taskbar on the left edge, you can put it back in its original place later. To do this, make sure that your taskbar is not fixed, click between the space between Start and the dotted area and drag it down with the mouse. Now your previous icons should be too large, so you can right-click on the area where your icons are located and then select "Small icons" under "View". Now you have pleasantly small icons that also fit comfortably in the normal task bar.
Use only one folder
Of course, you can also use a single folder instead of the two folders for quick start icons and shutdown shortcuts.
Samples
Here are two samples of what your taskbar could look like after the workshop:

![]()
Questions or problems with this workshop? Mail to the author
Windows-Tweaks thanks the diligent reader Martin G. for this detailed workshop!

On Windows Tweaks you will find time-saving tech guides for PC, software & Microsoft. For a stress-free digital everyday life. Already We have been tweaking Windows since 1998 and just don't stop!
