
Quick overview:
Many users shy away from installing an operating system with a critical eye. However, these processes are now very simple and largely straightforward, so that even beginners can attempt them. If you now follow these instructions, nothing can go wrong.
The requirements for your computer
In this day and age, Windows 98 no longer makes any great demands on the computer. You should have at least 32 megabytes of RAM to enjoy your work. Computers with only 32 megabytes or less have to make compromises. It is therefore advisable to switch off the new functions (web view) so that Windows runs without complications and sufficiently fast.
Microsoft personally specifies a minimum of 16MB, which I think is an understatement.
The processor should also be able to do a lot. The official minimum requirements in this area are 90 Mhz, although I can only guarantee optimal operation from 200 Mhz.
Windows 98 requires approx. 200 megabytes on the hard disk, which should no longer be a problem with today's computers with dozens of gigabytes.
If your computer meets these requirements, you can continue reading with peace of mind.
Clever use of the installation parameters
The Windows 98 installation can be customized in many ways. For example, you can decide whether the hard disk check takes place or whether the network setup is skipped. If you start the installation in the conventional way, you do not get the chance to set these settings, which are accessed via so-called parameters. The use of these is very simple:
1. Switch on your computer and press the ENTF or F2 key directly to access the computer's basic program (BIOS). The keys and some terms may differ - a look at the manual will not hurt in most cases.
2. You should now see a blue/yellow screen in front of you in which you go to BIOS Features Setup using the cursor and press ENTER.
3. You can change the options using the Page down/Page up or Enter keys. Do this by assigning the CD-ROM or D:\ (or any other drive) option to the Boot Sequence or Boot Drive entry. Press ESC to return to the previous menu.
4. Now move the cursor to Save & Exit Setup and insert the Windows 98 installation CD into the drive.
5. After a restart, the welcome screen appears:
Microsoft Windows 98 CD-ROM start menu
1. start from hard disk
2. start from CD-ROM
You decide on number 2 and confirm this.
6. The next dialog will now ask you:
1. start Windows Setup from CD-ROM
2. start computer with CD-ROM support
3. start computer without CD-ROM support
Here you decide on point 2 again and confirm your selection again.
7. After a short time, you will find yourself in the DOS, a black and white nothing, with a flashing cursor behind A:\>.
8. Type in the letter of your CD-ROM drive. For example, E: and press Enter. You are now on the drive.
9. Enter the command setup followed by the parameters you require. As an example, if you reject the hard disk check and skip the network configuration, the following parameter is suitable: setup /iq /in
Here you will find a list of all parameters:
| /PJ | This switch activates ACPI if you have problems with Advanced PowerManagement. |
| /PI | If you have an older bios and have problems with hardware detection, you can use these parameters to avoid problems. |
| /IQ | No cross-connected files are searched for during the Scandisk run at the start of the setup |
| /IN | Deactivates the setup of the network |
| /IR | This important switch allows you to keep your boot manager for new installations, which would otherwise be overwritten. |
| /NF | Deactivates the creation of a boot disk during setup. |
| /ID | The system does not check whether sufficient hard disk space is available for the installation. |
| /IS | Scandisk is not started at startup. If errors occur on a drive, Scandisk prevents the installation. |
| /IM | The working memory check is bypassed. |
| /NM | Win98 determines the system data and cancels the setup if your PC is below the minimum requirements. However, it is not recommended to install Windows on such slow PCs (under 486 with 66Mhz). You will hardly enjoy working with it. |
Installation with prior formatting of the hard disk
If you want to get rid of your old operating system and all your data in order to create a new Windows 98, you will need to format the hard disk. And this is how you do it:
1. Follow steps 1-8 of Using the installation parameters skillfully exactly.
2. Now type cd win98 and confirm this by pressing the ENTER key.
3. Now enter the command format c: and tell the warning with J that you are deadly serious. The formatting, which can take a very long time depending on the size of the data carrier, takes its course.
4. At the end you will be asked for a hard disk name, which may be a maximum of 11 characters long.
5. Now type setup (you can also use the parameters now if you like) to finally get the installation started.
6. The computer is now checked for performance and the hard disk is checked one last time so that Windows can be installed optimally.
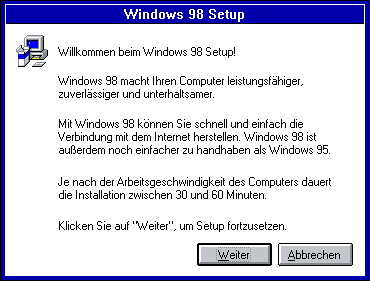
7. You will now be warmly welcomed by the installation wizard, which will guide you through the rest of the process. The associated welcome and the extremely long text should also be skipped with Further. In the next dialog box, select the entry I agree to the contract.
8. Now you are spoiled for choice with the installation type. I recommend that even beginners choose Custom so that you don't install anything superfluous that you don't need anyway. Before that, you will be asked for your name and organization, which you answer honestly.
9. The next window is all about the computer name, the workgroup and its description. This is only of interest and importance in the network.
10. The next windows deal with the language, which only includes the date, time, currency and keyboard layout, as well as creating a boot disk, which you can safely skip.
11. A confirmation with Finish starts the Windows copying process. You may get scared at 10% because the process stops here. I can reassure you - after the longer pause, it continues quickly and smoothly.

12. As soon as the copying of the files is complete, Windows 98 asks for a restart, which you also allow. Now press ENTF or F2 again to enter the BIOS as described above. Now set the boot sequence from CD-ROM back to C only or IDE-0 so that the computer no longer searches for installation CDs.
13. The installation wizard suddenly pops up again and explains its intention. It installs all device drivers and requests a reboot in between before getting down to business - namely the Windows settings and completing the installation.
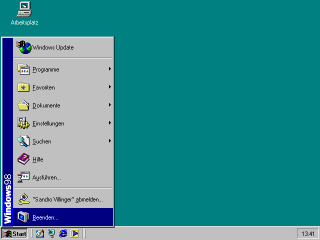
13. One last reboot and you will be faced with your new Microsoft Windows 98 operating system. You can confidently confirm the question about the password with OK. You will then no longer be bothered with it. For the first time, you have the desktop, the interface of 98, in front of you:
After this successful installation, you should start with the next chapter First steps to improve performance and stability.
This article was produced by Sandro Villinger and comes from the Windows tweaks archive, which has been built up since the late 1990s.

On Windows Tweaks you will find time-saving tech guides for PC, software & Microsoft. For a stress-free digital everyday life. Already We have been tweaking Windows since 1998 and just don't stop!
