
Quick overview:
The famous GeForce graphics card generation from the Nvidia chip factory has been providing fast 2D and 3D acceleration for some time now. Even the old GeForce 1 still makes a brilliant impression in today's gaming world. However, if games on your Nvidia card come to a standstill and the gaming fun turns into a slideshow, you have to do a little work yourself...
In the following article, I describe how you can get the last bit of speed out of these graphics cards.
Step 1: The optimal BIOS configuration
The computer's basic program controls all inputs and outputs, recognizes all hardware and configures it correctly. For this very reason, the BIOS is the first port of call when it comes to dropouts during gaming.
How to enter: Press either the F2 or the DEL key immediately after switching on the computer. If this does not work, you should pay attention to possible screen messages with the text Press XXX to Enter Setup or take a look at the computer manual. You will usually find what you are looking for here. Note: The following terms vary from BIOS to BIOS. However, they are usually similar:
Once you are in the Basic Input Output System, the first path leads directly to the BIOS Feature Setup and the BIOS Chipset Setup. Move to it with the arrow keys and press Enter. In most cases, the options listed below are changed using PICTURE UP and PICTURE DOWN or by pressing ENTER. If some options are not listed, this is not a problem. However, you will find many of them listed.
L1/L2 Cache or Enable CPU First Level/Secondary Leve Cache
This lets you turn off and on the small (but fast) cache integrated on your processor. This is the most important point in the BIOS, because if you switch off this cache, you will notice a very large drop in performance and booting Windows alone could be delayed by several minutes. So both should always be set to Enabled.
System BIOS Cacheable
Copies the BIOS from its ROM chip to the RAM for faster execution. Set this value to Enabled.
Memory Hole
You should deactivate this setting if you no longer use ISA cards in your computer. ISA is an older standard for slots, as used in the past for sound cards or graphics cards. Nowadays, PCI and AGP are the standards. In short: Without ISA cards, you can safely set Disabled.
Passive Release
This setting brings great speed advantages if it is activated. However, you should not change anything here if you have ISA cards in your computer.
PCI/VGA Palate Snoop
You should only leave this setting activated for older 2D graphics cards such as Matrox Millennium 8MB. Otherwise, switching to Disabled will increase speed.
Video BIOS Shadow
You should set this option to Disabled, as it only means a plus (and here a huge plus) in speed in the DOS and Windows 3.1 sector.
AGP Aperture Size
For GeForce card owners, we recommend the setting 128 or 64MB.
Step 2: Install the correct drivers
For an all-round smooth-running operating system, we recommend installing the following programs:
- If your mainboard is based on the VIA chipset, we recommend using the VIA 4in1 driver. The latest version is available here: Via 4in1 4.12
- The most important thing for an Nvidia graphics card are the famous reference drivers called Detonator. They apply to all cards from TNT to GeForce 4. As the new Nvidia Detonator causes problems, I recommend using version 21.81. These and other reference drivers are available at www.guru3d.com
Step 3: Configure the Nvidia Detonator correctly
The default settings of the reference driver are not well tuned and slow down the system unnecessarily. The fastest settings are listed below. Be sure to follow this trick first.
How to access the driver properties:
Right-click on the desktop and select Properties. In the window that now appears, switch to the Settings tab.
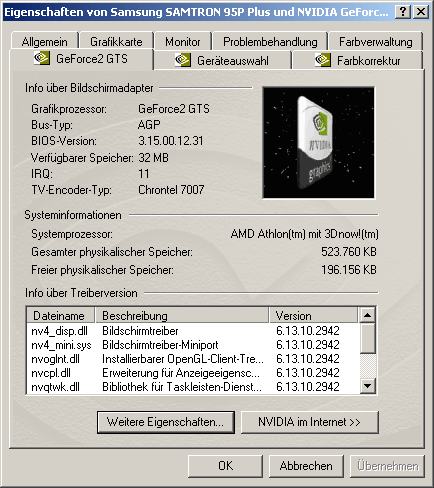
Now click on the Advanced button and switch to the entry for your GeForce graphics card, e.g. GeForce2 GTS . After clicking on More properties, you are already in the heart of the driver. The following properties are revealed
AntiAliassing is a method of minimizing the build-up of stippling in games. However, activating this function also causes the speed to plummet. It is best to leave the setting at Off.
The Direct3D tab
Now switch to Direct3D settings and change the following settings:
Enable veil table emulation - This function offers compatibility for some games. A good example is Final Fantasy VII. I recommend checking this setting. It has neither a positive nor negative effect on the speed.
Display logo when running Direct3D applications - The Nvidia logo is displayed here for every Direct3D game. If you like it...
Mipmap detail level - I recommend leaving this setting at maximum, as the image quality suffers greatly with a small increase in speed, which is not worth it.
Memory size for PCI textures - This setting should be set to 16 MB if you have a PCI GeForce card. AGP users are not affected and should enter the lowest value here.
Now click on the OpenGL button. The following options should be set here:
Texel alignment - For the best possible speed, I recommend moving the slider to the far right.
Vertical synchronization mode - As some games experience a drop in speed with regard to the response of the mouse and keyboard, you should switch this to Always off.
Maximum rendering - set here to 0 for optimum speed.
The OpenGL tab
Now switch to OpenGL settings and change the following settings:
Enable buffer area extension - You should definitely enable this setting for fast gameplay, as some games can benefit immensely from it.
Dual area extension... - There should only be a check mark here if the above option is activated.
Use fast liner mipmap linear filtering - I recommend activating these settings. You will notice a small increase in speed with no visible decrease in image quality in any of the OpenGL games tested.
Disable support for extended CPU command sets - There should be no checkmark here. Otherwise, the extended processor commands such as AMD 3D Now will be disregarded.
Standard color depth for textures - I recommend setting this to 16 BIT, as this setting is much faster than 32 BIT. The image quality should hardly decrease noticeably.
Buffer reversal mode - It is best to leave this setting at Automatic selection.
Vertical synchronization - As some games experience a drop in speed with regard to the response of the mouse and keyboard, you should switch this to Always off.
Anisotropic filtering - This feature improves the image quality but also causes a drop in performance. I therefore recommend setting this option to Disabled.
Memory size for PCI textures - This setting should be set to 16 MB if you have a PCI GeForce card. AGP users are not affected and should enter the lowest value here.
Confirm all windows with Ok and you can start having fun!
NOTE FOR NEW PUBLICATION: This article was produced by Sandro Villinger and comes from the Windows Tweaks archive, which has been built up since the late 1990s.

On Windows Tweaks you will find time-saving tech guides for PC, software & Microsoft. For a stress-free digital everyday life. Already We have been tweaking Windows since 1998 and just don't stop!
