
Quick overview:
Unter Windows 2000/XP und .NET gibt es die Möglichkeit die Verteilung der Prozessor-Leistung einzustellen, was für manche Programme eine Steigerung der Performance bedeuten kann. Diese so genannte CPU-Priorität kann man im Task-Manager einstellen, zu welchem man über STRG+ALT+ENTF Zugriff hat. Hier klickt man mit der rechten Maustaste unter Prozesse auf die jeweilige Anwendung wie z.B. Fusion.exe (Das Webgestaltungsprogramm NetObjects Fusion) und legt über Set Priority die Verteilung fest. Leider merkt sich Windows diese Einstellung nicht, was man aber folgendermaßen umgehen kann: Man kann mit Leichtigkeit eine Batchdatei anlegen, welche als Verknüpfung dienen und das entsprechende Programm schon mit einer voreingestellten Priorität starten.
Note: As batch files are based on DOS, it is (unfortunately) not possible to fully specify programs that are located in directories with spaces. Therefore, references to files with folder names such as C:\Program Files\Windows Media Player are only possible if you use a ~ (tilde) after 8 letters (CTRL+ALT+~).
Example:
Echo off
Start /high D:\POWERD~1.0\PowerDVD.exe
You have to go to the command prompt (Start menu/All programs/Accessories) and enter dir /x to find out what those files are called in the form of 8.3 file names (under DOS).
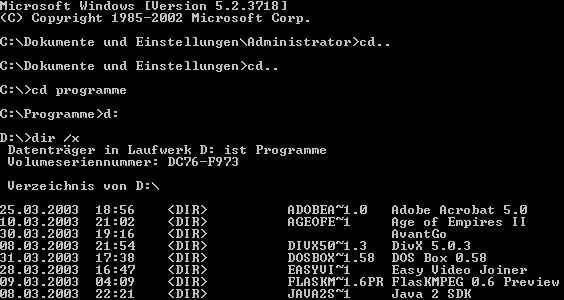
To get to the relevant directories, you must type cd DIRECTORY NAME (as in the example with programs). To change back one directory level, simply type cd... You can change the drive by simply typing the letter followed by a colon, e.g. D:, followed by Enter, which applies to all commands.
And this is how you proceed if you want to create a shortcut including direct setting of the CPU priority:
1. Navigate to the Windows folder and create a new directory called Priority rules, which will serve as the central location for the shortcuts. Now right-click here and select New/Text document. Now write the following lines into this:
Echo off
Start /high C:\Programme\Trillian\trillian.exe
This is only an example link, which is why you must replace the path specification with your own to the program.
Instead of the /high parameter, you can use the following options to set the CPU priority:
- /Realtime: The entire performance is allocated to the CPU, although I cannot recommend this as the system could become very unstable.
- /High: Most of the CPU power is used for the program.
- /AboveNormal: The application is allocated slightly more than the usual processor resources (approx. 10-30 % above average).
- /Normal: This should be clear, although this makes no sense here as it is your default setting.
- /BelowNormal: The processor only allocates half as many resources to the program as usual.
- /Low: The desired application is hardly given any attention by the CPU and is processed very slowly.
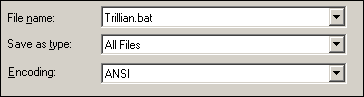
2. Click on File/Save as and save it, as in our example, as Trillian.bat, whereby you must set File type to All Files so that you can change the file extension from .txt to .bat.
3. From the folder C:\WINDOWS\Priority Rules, create shortcuts to each of these .bat files on the desktop and label them with the icon of the associated program: Right-click on the file and select Properties - then click on Change Icon and navigate to the program folder.
From now on, you can start your programs with the desired priority without having to use the task manager every time.
This trick was created in connection with an article in the forum, which was answered by the sensational B3n3.
NOTE FOR NEW PUBLICATION: This article was produced by Sandro Villinger and comes from the Windows Tweaks archive, which has been built up since the late 1990s.

On Windows Tweaks you will find time-saving tech guides for PC, software & Microsoft. For a stress-free digital everyday life. Already We have been tweaking Windows since 1998 and just don't stop!
