
Quick overview:
Bereits bei Windows 2000 gab es die Möglichkeit der Integration eines Service Packs in eine Installations CD. Dies erspart ihnen nicht nur den Schritt der später folgenden SP-Installation, sondern dies kann auch Probleme während des Setups von vornerein lösen, da bei der Windows Installation nun auch die neuesten Dateien verwendet werden. Die Geschichte wiederholt sich, denn auch mit Windows XP und seinem neuen SP1 ist dies ohne weiteres möglich. Mit dieser neu gebrannten CD haben Sie dann eine brandaktuelle XP-Version und können ihre Original CD im Regal belassen.
And this is how you proceed:
1. Folgendes müssen Sie vorbereiten:
- Laden Sie sich das Windows XP Service Pack 1 hier herunter!
- Die benötigte Bootdatei haben wir ihnen hier bereitgestellt.
- Wir arbeiten mit Nero Burning Rom 5.5.
- Halten Sie ihre Original Windows XP CD-Rom immer bereit
- Sie benötigen ca. 1000 MB Speicherplatz auf der Festplatte und natürlich einen CD-Brenner.
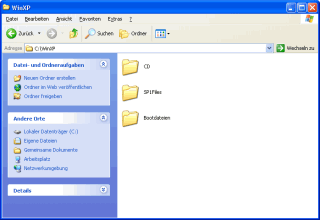
2. Legen Sie auf ihrer Festplatte ein Verzeichnis namens WinXP an und erstellen Sie darin drei Unterordner mit den Namen CD, SP1Files und Bootdatei.
3. In ihr Laufwerk legen Sie nun die Windows XP CD-ROM ein und kopieren alle Daten in den Ordner WinXP\CD. Nun packen Sie das heruntergeladene SP1 in das Verzeichnis WinXP und nennen Sie es in xpsp1 um, was aber nicht nötig ist, sondern der Einfachheit dient. Klicken Sie nun im Startmenü auf Ausführen und tragen Sie C:\WinXP\XPSP1.exe /x:C:\WinXP\SP1Files ein. Nach dem Klick auf OK startet das Entpacken in das SP1 Verzeichnis. In unserem Beispiel haben Sie das Laufwerk C:\ gewählt, wobei Sie bei anderen Laufwerken den Buchstaben anpassen müssen.
Create a working Windows XP ServicePack CD
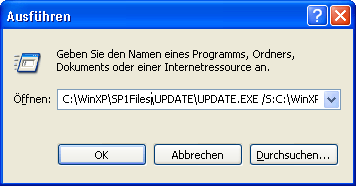
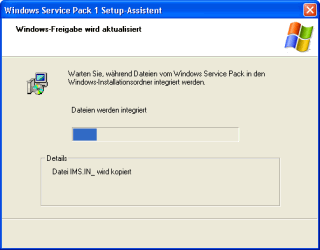
4. Nun müssen sich die Service Pack Dateien mit den XP CD Dateien verschmelzen, was über den Befehl C:\WinXP\SP1Files\UPDATE\UPDATE.EXE -S:C:\WinXP\CD unter Start/Ausführen vor sich geht. Extrahieren Sie nun die Bootdatei.zip in den Ordner Bootdatei, welchen Sie anlegten.
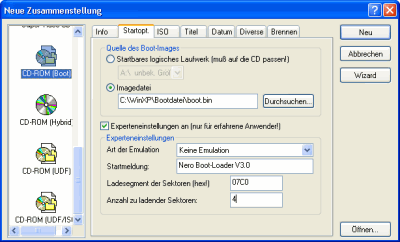
5. Öffnen Sie nun das Brennprogramm Nero Burning Rom 5.5 und schließen Sie den auftauchenden Assistenten. In der linken Auswahlliste des Hauptfensters entscheiden Sie sich für CD-ROM (Boot) und nehmen folgende Einstellungen unter Startopt. vor:
- „Imagedatei markieren und unter „Durchsuchen den Pfad „C:\WinXP\Bootdatei\boot.bin angeben. Vorher die Datei noch unter „Dateityp mit „Alle Dateien sichtbar machen.
- Unter „Art der Emulation auf „Keine Emulation, sowie in „Ladesegment der Sektoren kontrollieren, ob „07C0 steht.
- Die Anzahl der zu ladenden Sektoren unbedingt auf „4 stellen.
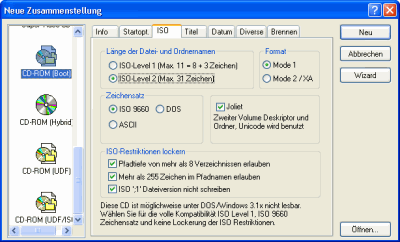
6. Öffnen Sie nun die Registerkartei ISO und aktivieren Sie ISO-Level-2 (Max. 31 Zeichen). Folgende Einstellungen müssen ebenso durchgeführt werden:
- Unter Format muss „Mode 1 stehen.
- Der „Zeichensatz ist auf „ISO 9660 zu stellen
- „Joliet muss unbedingt aktiviert werden.
- Unter „ISO Restriktionen müssen alle 3 Optionen mit einem Häkchen versehen werden.
7. Im Registerreiter „Titel müssen Sie beachten, dass „ISO9660 ausgewählt wurde. Unter „Bezeichnung sollten Sie den Namen ihrer XP-CD eintragen, wie z.B. „WXPVOL_DE . Die restlichen Felder können freigelassen werden, wobei Sie darauf achten müssen, dass ISO9660 Bezeichnungen auch für Joliet verwenden aktiviert ist. Es sollte auch das Originaldatum über Datum und Uhrzeit der Originaldatei verwenden benutzt werden! Klicken Sie letztendlich auf CD fixieren unter Brennen und wählen Sie endlich die Schaltfläche Neu.
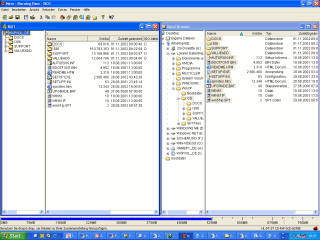
Hier schieben Sie alle Dateien des Ordners C:\WinXP\CD ins linke Teilfenster und warten den Ladevorgang ab.
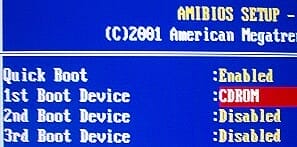
8. Nun, da das abgeschloßen ist, können Sie sich der Schaltfläche CD-Brennen widmen und dort ihre fertige startfähige XP Service Pack 1 Setup CD brennen. Nach dem Brennvorgang müssen Sie diese Einlegen und im BIOS unter BIOS Features Setup die Boot Sequence auf CD-ROM stellen. Nach dem Speichern und dem Neustart sollte das Installationsprogramm starten.
NOTE FOR NEW PUBLICATION: This article was produced by Sandro Villinger and comes from the Windows Tweaks archive, which has been built up since the late 1990s.

On Windows Tweaks you will find time-saving tech guides for PC, software & Microsoft. For a stress-free digital everyday life. Already We have been tweaking Windows since 1998 and just don't stop!
