
Quick overview:
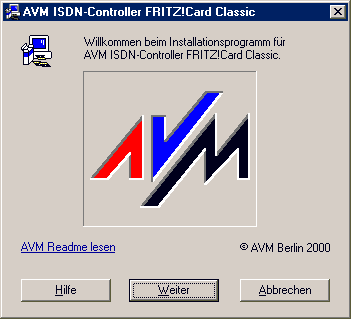
ISDN (Integrated Services Digital Network) Technologie beschert dem Internetbenutzer ein zusätzliches Plus der Geschwindigkeit gegenüber Modem sowie eine stabilere Verbindung. Falls Sie eine ISDN Karte in ihrem Computer stecken haben sowie im Besitz einer entsprechenden Telefonanlage sind wird ihnen diese Anleitung helfen ihr Windows Me für ISDN flott zu bekommen. Wir benutzen als Beispiel die AVM Fritz Karte:
1. Klicken Sie nacheinander auf Start > Einstellungen > Systemsteuerung um in die Systemsteuerung zu gelangen: Dem Dreh- und Angelpunkt ihrer Computereinstellungen.
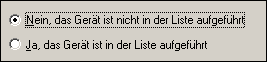
2. Starten Sie Hardware und wählen Sie zweimal hintereinander Weiter. Bevor Sie nun erneut auf Weiter klicken markieren Sie Nein das Gerät ist nicht in der Liste aufgeführt.
3. Wählen Sie im daraufhin erscheinenden Fenster Nein, Hardware in der Liste wählen und doppelklicken Sie auf Andere Komponente.
4. Ein Liste erscheint, welche Sie komplett ignorieren und Diskette anklicken. Legen Sie nun die Treiberdiskette oder CD-ROM ihrer ISDN Karte ins Laufwerk und navigieren Sie über den nun erscheinenden Explorer zum Pfad der Treiber.
5. Der Rechner installiert nun die Treiber und richtet das System ein. Sie werden nach einer Zeit gebeten den Computer neuzustarten - dieser Aufforderung gehen Sie nun nach.
6. Sobald Windows Me wieder hochgefahren hat ploppt eine Meldung auf, die Sie zur Installation des wichtigen CAPI Ports aufruft.
7. Wieder einmal ist hier der einzige Ausweg ein Klick auf Weiter. Im nun folgenden Dialog wählen Sie noch ein Verzeichnis auf ihrer Festplatte für die Dateien. Ich empfehle einen übersichtlichen Pfad wie z.B. C:\Programme\AVM ISDN Controller Fritz! Card einzutippen, damit Sie später nicht den Überblick bei vielen Programmen verlieren.
8. Im nächsten Fenster entscheiden Sie sich für Euro ISDN und bestätigen wieder einmal.
9. Zum Abschluss werden noch einige relevante Informationen angezeigt, die ihre Treiberinstallation betreffen.
10. Öffnen Sie jetzt wie oben beschrieben den Hardwareassistenten und durchlaufen Sie Schritt 1 bis 3 nochmal. Nun wählen Sie nicht Andere Komponenten sondern Netzwerkkarten.
11. Klicken Sie im nächsten Fenster (mit der großen Liste) auf Datenträger und gehen Sie auf den Ort der CAPI Treiberdateien auf ihrer Treiber CD-ROM/Diskette. Diese sind wie oben meiste eindeutig beschrieben oder im Hanbuch verzeichnet.
12. Im nächsten Fenster erscheint nun das Gerät AVM NDIS WAN CAPI-Treiber (WDM). Klicken Sie wieder auf Weiter um diesen Treiber zu installieren. Im nächsten Fenster müssen Sie noch auf Fertig stellen klicken damit die Treiber eingebunden werden.
13. Es erscheint ein neues Konfigurationsfenster ISDN Konfiguration in welchem Sie zuerst auf Weiter und dann unter D-Kanal-Protokoll auf Automatisch stellen. Falls Sie ihren Computer als Fax/Anrufbeantworter benutzen wollen, müssen Sie nur diese Nummer hier eintragen und bestätigen. Ein Klick auf Fertig stellen schließt die ISDN Installation ab und lässt ihren Computer neu starten.
Jetzt fehlt nur noch die Einwahl ins Internet. Und so gehen Sie vor: Bald sind Sie online - die Einwahl ins Internet.
NOTE FOR NEW PUBLICATION:This article was produced by Sandro Villinger and comes from the Windows Tweaks archive, which has been built up since the late 1990s.

On Windows Tweaks you will find time-saving tech guides for PC, software & Microsoft. For a stress-free digital everyday life. Already We have been tweaking Windows since 1998 and just don't stop!
