
Quick overview:
Microsoft's new operating system has many settings that allow you to work quickly, such as memory settings. However, in some cases, these values change on their own, meaning that a drop in speed is to be expected. This article deals with these secret Windows settings. I recommend checking these often:
Check boot defragmentation in XP
The boot process of an operating system is referred to as the startup process. During this time, files and drivers are loaded that are necessary for the operation of Windows. However, these files can get quite mixed up, which is why the computer takes longer to load them. This is known as boot fragmentation. Windows XP has the option of eliminating this disorder through boot defragmentation. This feature is activated by default. In some cases it is switched off for unexplained reasons. To check the setting:
1. Click on Start > Run... and type regedit followed by Enter in the command line that appears.
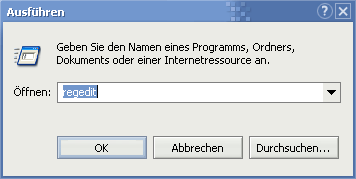
2. The editor for editing the Windows registry database appears. Navigate through the keys HKEY_LOCAL_MACHINE\SOFTWARE\Microsoft\Dfrg\ BootOptimizeFunction one after the other. Now double-click on Enable in the right-hand pane and enter Y in the line that appears. If this is already there, you don't need to worry about anything else.
The prefetcher setting in XP
Windows XP remembers frequently used files and programs and cleverly loads them into the main memory during the start-up process. You will notice this with Windows Media Player, for example. If you load it for the first time directly after installing Windows, it will take some time to build up. At some point it takes a fraction of a second - although this also depends on the computing power! If you think you can speed up the WinXP startup process by switching off the prefetcher, you are mistaken. The prefetcher feature can even speed it up. If you disable it, the process will be slower. Windows then takes 5 seconds longer to start. To activate this setting - if you have not already done so:
1. Carry out step 1 of the first trick
2. The program for editing the Windows registry appears. Navigate successively through the keys HKEY_LOCAL_MACHINE\SYSTEM\ CurrentControlSet\Control\Session Manager\Memory Management\ PrefetchParameters and double-click EnablePrefetcher in the right-hand pane. Make sure that a 3 is entered in the window that appears. If not: Make this up and confirm with Ok.
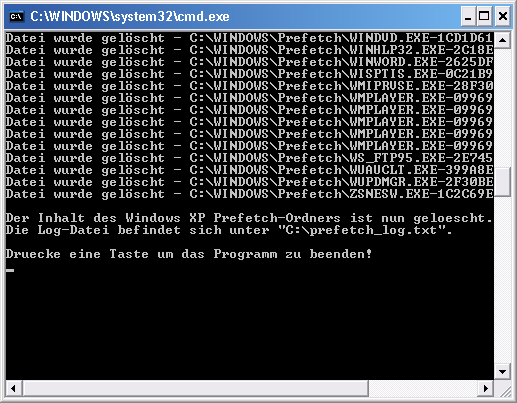
Small addition: The frequently used files are stored in a special folder, which will fill up unnecessarily after a while. I recommend emptying it every 2 weeks. Proceed as follows: Open My Computer and navigate to your Windows directory. Double-click on the Prefetch folder and delete the entire contents. Our reader, Thorsten Wisser, has written a script specifically for deleting the Prefetch folder, which deletes the contents of the Prefetch folder and creates a log file. You don't get more convenience than this:
Important: If the deleted files do not write themselves back into the Prefetcher directory, there is a problem that can be solved by BootVis. Follow these instructions to use BootVis correctly.
NOTE FOR NEW PUBLICATION: This article was produced by Sandro Villinger and comes from the Windows Tweaks archive, which has been built up since the late 1990s.

On Windows Tweaks you will find time-saving tech guides for PC, software & Microsoft. For a stress-free digital everyday life. Already We have been tweaking Windows since 1998 and just don't stop!
