
Quick overview:
Die Grafikkarte ist die Komponente ihres Rechners, die für das visuelle Geschehen am Monitor verantwortlich ist. Klicken Sie hier, um mehr über diese Hardware sowie die nun verwendeten Fachbegriffe zu erfahren.
Windows Me erkennt in vielen Fällen die Grafikkarte und setzt automatisch die ergonomischste Auflösung, Farbtiefe und Bildwiederholfrequenz, damit ihre Augen bei der Arbeit nicht müde werden. Leider bietet WinMe nur Standarttreiber, welche das wahre Potential der Karte in Hinsicht auf Leistung und Funktionen nicht ausschöpfen können. Aus diesem Grunde ist es empfehlenswert die speziell zugeschnittenen Treiber des Herstellers zu benutzen. In besonders harten Fällen erkennt Windows Me ihre Grafikhardware überhaupt nicht und setzt niedrige Standartwerte. Hier sehen Sie ein Beispiel mit der mageren Auflösung von 640x480 und spärlichen 16 Farben bei augenschmerzenden 60Hz:
Gegen diesen Zustand kommen Sie nur mit den Herstellertreibern an - erst danach verwandelt sich das lieblose und schädliche Monitorbild in eine Augenweide. Und so gehen Sie vor:
1. Suchen Sie sich aus dieser Liste die passenden Hersteller ihrer Grafikkarte aus und besuchen Sie ihre Treiberseiten um die aktuellsten Versionen herunterzuladen. Besitzer von Nvidia GeForce Karten kann ich den Treiber mit der Bezeichnung Nvidia Detonator 44.03 wärmstens empfehlen, da er der bislang schnellste und stabilste Treiber der großen Reihe der Detonatoren ist. Sie finden diesen und viele andere auf www.guru3d.com. Falls auf ihrer Karte ein Kyro II Chip der Firma PowerVR werkelt so empfehle ich dir aktuellen Referenztreiber von www.powervr.com
2. In besonders komfortablen Fällen ist die heruntergeladene Datei ein Installationsprogramm, welches Sie direkt per Doppelklick ausführen. Manchmal wird ihnen auch ein besonderer Stein in den Weg gelegt: Die Dateien sind im ZIP Format vorhanden, welches Sie zunächst über einen Rechtsklick auf die Datei und der Menüauswahl Extrahieren in ein lesbares Format verwandeln. Das Programm www.winace.com für das Entpacken notwendig!

Nun sollten diese in einem Ordner vorhanden sein. Ich fahre in dieser Anleitung nun mit diesem umständlich Beispiel anhand einer GeForce II GTS fort.
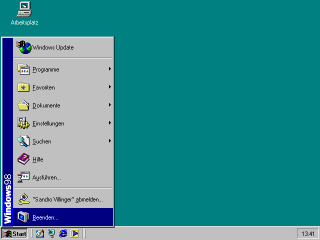
3. Klicken Sie nachdem die Dateien entpackt sind mit der rechten Maustaste auf einen beliebigen Teil der Windows Oberfläche (Desktop) und wählen Sie Eigenschaften.
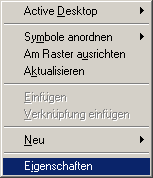
4. Ein neues Fenster ploppt auf in welchem Sie den Registerreiter Einstellungen hervorheben und sofort unten auf Weitere Optionen klicken.
6. Ein weiteres Fenster tut sich vor ihren Augen auf. Wechseln Sie nun schnurstracks ins Register Grafikkarte und klicken Sie auf Ändern. Der Treiberassistent startet und Sie wählen nach einem Klick auf Weiterden Eintrag Nach einem besseren als den derzeit verwendeten Treiber suchen. Die nächste Auswahl meistern Sie indem Sie zunächst auf Geben Sie eine Position und dann auf Durchsuchen klicken. Nun wird ein Ordnerfenster geöffnet. Hangeln Sie sich nun bis zu dem Ordner duirch, den Sie vorhin entpackt haben und markieren Sie in. Ein Klick auf OK bestätigt ihr Vorhaben.

7. Die Treiber werden erkannt und nach ihrem OK Einverständnis auch bis zur Meldung Fertig stellen, welche Sie sofort bestätigen, installiert. Nun sollten Sie ihren Computer neu starten - sie werden dazu eine separate Aufforderung erhalten.
8. Nach einem Neustart erstrahlt ihre Windows Me Oberfläche in einer glanzvollen Pracht mit hohen Bildwiederholfrequenzen und vielen Farben.
Da damit ja die die Installation der Grafikkarte abgeschlossen wäre, müssen wir uns an den Feinschliff und die optimierten Einstellungen wagen, welche Sie in diesem Artikel detailliert nachlesen können: Die optimalen Einstellungen für ihre Grafikkarte - Tipps fürs perfekte Bild
Sie könne auch direkt vom Bild zum Ton übergehen: Einfache Einrichtung des Soundkartentreibers sowie Fakten, Tipps und Qualitätstuning
NOTE FOR NEW PUBLICATION:This article was produced by Sandro Villinger and comes from the Windows Tweaks archive, which has been built up since the late 1990s.

On Windows Tweaks you will find time-saving tech guides for PC, software & Microsoft. For a stress-free digital everyday life. Already We have been tweaking Windows since 1998 and just don't stop!
