
Quick overview:
Windows leitet bei seinen Standardeinstellungen die Daten von der Festplatte oder des CD-ROM Laufwerkes über den Prozessor zum Arbeitsspeichr. Dies belastet den Prozessor, weil er nicht für diese Art von Rechnungen optimiert wurde und so verringert sich die Geschwindigkeit bei solchen Operationen (und das sind die meisten bei einem herkömmlichen Systemalltag) gewaltig. Neben geringen Übertragunszeiten ruckelt auch die Maus und das System kann instabil werden.
This is where the DMA mode (Direct Memory Access) comes in handy because, as the name suggests, it shovels the data directly into the main memory and thus largely bypasses the processor. This setting is often switched on, but on some systems Windows is not sure whether the drives support this mode, which is definitely the case with today's computers. I generally recommend checking or activating the DMA mode. And this is how you proceed:
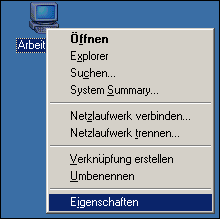
1. Right-click on Workplace and select Properties from the context menu that appears.
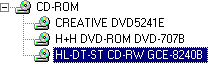
2. Now switch to the Device Manager tab and click on the plus sign in front of CD-ROM. Now double-click on both entries one after the other, which will be revealed to you.
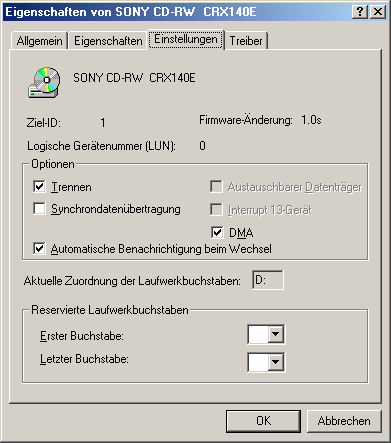
3. For each entry, a new properties window appears in which you pull out the Settings tab. Now click to tick DMA and confirm with OK.
4. After this click, the window closes and you are back in the Device Manager, where you now click on the plus in front of Drives.
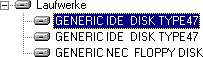
5. Check all entries here too and make sure that Settings is activated in the DMA mode.
6. After a restart, the data no longer rushes through the troubled processor but flows to the RAM at lightning speed, which means a significant increase in speed. If the plus disappears again in the settings after the restart, your drive does not support DMA mode (which can only happen with older models). In this case, go to the manufacturer's homepage and ask for a firmware update. We will be happy to help you in the forum.
NOTE FOR NEW PUBLICATION:This article was produced by Sandro Villinger and comes from the Windows Tweaks archive, which has been built up since the late 1990s.

On Windows Tweaks you will find time-saving tech guides for PC, software & Microsoft. For a stress-free digital everyday life. Already We have been tweaking Windows since 1998 and just don't stop!
